How can I set the BIOS to boot from a flash drive? detailed guide! How to enable booting the system from a flash drive in BIOS? Detailed guide with photos Create a USB flash drive for updating bios
Even though DOS is not an operating system that we widely use today, it may still be needed. For example, many BIOS update guides advise that all operations should be performed in this OS. So, here are instructions on how to make a bootable DOS flash drive.

The process of creating a bootable DOS flash drive in WinToFlash is no more complicated than in the previous described case:
- Run the program
- Select the "Advanced Mode" tab
- In the “Task” field, select “Create a drive with MS-DOS” and click the “Create” button
After this, you will be asked to select a USB drive that needs to be made bootable and, in less than a minute, you will receive a flash drive to boot your computer into MS DOS.
Another way
Well, the last method, for some reason the most common on Russian-language sites. Apparently, one instruction was distributed to everyone. One way or another, this method for creating a bootable MS-DOS flash drive does not seem optimal to me.
In this case, you will need to download this archive: http://files.fobosworld.ru/index.php?f=usb_and_dos.zip, which contains a folder with the DOS operating system itself and a program for preparing a flash drive.
- Run the USB Storage Tool program (HPUSBFW.exe file), specify that formatting should be done in FAT32, and also check the box that we intend to create a bootable USB flash drive specifically MS-DOS.
- In the appropriate field, specify the path to the DOS OS files (dos folder in the archive). Start the process.
Using a bootable DOS flash drive
I dare say that you made a bootable USB flash drive with DOS OS in order to boot from it and run some program designed for DOS. In this case, I recommend that before restarting the computer, copy the program files to the same flash drive. After the reboot, set boot from a USB drive in the BIOS; how to do this is described in detail in the manual: . Then, when the computer boots into DOS, to launch the program you will only need to specify the path to it, for example: D:/program/program.exe.

It should be noted that booting into DOS is usually required only to launch those programs that require low-level access to the system and computer hardware - flashing the BIOS and other chips. If you want to run an old game or program that does not run in Windows, try using DOSBOX - this is a more optimal solution.
That's all for this topic. I hope you solve your problems.
All the best to everyone!
One of the most common questions from users when installing Windows: "why doesn't the computer (BIOS) see my flash drive?". Naturally, I answered it several times, and more than once presented my recommendations on the blog. Now I decided to put them all together in this one article.
I’ll tell you right away so that the computer (laptop) “sees” your bootable USB flash drive (about how to create it correctly) - you need to configure the BIOS (UEFI) accordingly. If you don’t do this, then no matter how much you fight, nothing will work...
In this article I will show, using the example of several BIOS (UEFI) versions, how to do this correctly. I think this note will be very useful for those who do not reinstall the system very often.
Perhaps the article should start not with setting up the BIOS, but with how to enter it 👀... This is also far from so obvious and simple for an inexperienced user.
In general, it all comes down (usually) to immediately after turning on the computer/laptop, while only the first logo appears when loading, press special. key (preferably several times). If you pressed the correct key, you will see the treasured BIOS settings window.
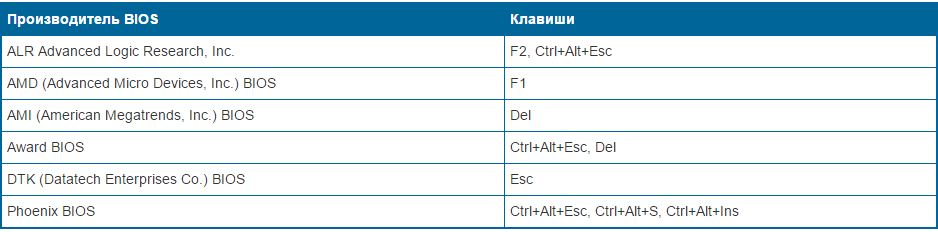
The most Common buttons to enter BIOS: F2, Esc, Del. If you have a laptop, then it is possible that you need to press them together with the Fn button (i.e., for example, Fn + F2). It depends on the keyboard settings in the same BIOS...
The main difficulty is that there is no single key to enter the BIOS! Each manufacturer may have its own specials. keys (sometimes these are entire combinations of 3-4 buttons!).
Below I will give several options for how to enter the BIOS and provide links to articles where you can find out these treasured keys.
Option #1
If you have Windows 8/10 installed on your computer, you can stop guessing with buttons at all, but enter the BIOS from the OS interface. This is done quite simply, see the instructions, the link to which is given below.
To help!
How to enter UEFI (BIOS) from the Windows 8, 10 interface (without using special keys F2, Del, etc.) -
Option No. 2
To find out the key to enter the BIOS, you can use the documentation (which came with your device upon purchase), or special. tables and specifications (there are plenty of them on the Internet).
I also have several tables and instructions posted on my blog, perhaps you can learn something there.
Instructions!
1) how to enter BIOS or UEFI (instructions) -
2) tables with buttons to enter the BIOS / Boot Menu for different PC manufacturers -
Option #3
Notice the first screen that appears immediately after you restart your computer (to see the first screen, restart the computer, not turn it on...).
If you do not have time to see the “first” screen (or read the information on it) - press the key Pause (Break).
If you manage to do this, the screen will “freeze” and wait for your next click (that is, you will be able to read and inspect everything).
The screenshot below shows the AMI BIOS welcome screen: F2 or Del- these are buttons to enter BIOS settings (in English: to run Setup).

AMI BIOS: F2 key - enter BIOS settings.
Option 4
Some laptops have special buttons to enter the BIOS (they are usually small and located either next to the power button or next to the power socket).

You need to press them with a pen (or pencil) when the laptop is turned off. After clicking on it, the device will turn on and you will be presented with the boot menu (from which you can go to the BIOS).

Boot Menu / Lenovo (as an example)
Basics
Note: for those who are already more or less familiar with BIOS controls, this section of the article can be skipped.
Control keys, changing settings
In the BIOS you will have to manage and set settings without using the mouse (This scares many novice users. By the way, UEFI supports the Russian language and mouse).
In fact, even on Windows (where the mouse works) - many actions are much faster to do using the keyboard!
The control buttons are, for the most part, the same everywhere. (although there is a difference, it is usually not significant). One more detail: there is a hint on the right or bottom in the BIOS: it indicates all the main control keys (see photo below).

Control keys (AMI BIOS)
Main keys:
- F1 - call for help (help);
- Arrows ← and → - select a settings section (for example, Boot, Advanced, etc.);
- Arrows ↓ and - select a specific parameter in the desired section;
- + and - - change settings (increase/decrease);
- F10 - Save BIOS settings and exit (can be pressed while in any BIOS section);
- ESC - exit;
- Enter - set (confirm) the selected parameter/or open a parameter or section for further configuration (in general, one of the most basic keys).
In general, knowing these dozen buttons, you can easily change all BIOS settings.
Saving settings
You can change any settings in the BIOS, but they will take effect only after you save and reboot the device (by the way, the computer/laptop reboots automatically after exiting the BIOS).
- Press key F10- in most BIOS versions it means saving the settings and rebooting the device;
- Go to section Exit and click on Save Changes and Exit(save the settings and exit, an example is shown in the screenshot below - arrows 1 and 2).

By the way, you can exit the BIOS without saving the settings - to do this, select in the section Exit option Discard Changes and Exit (discard settings and exit / do not save settings, exit).
You can also exit the BIOS by simply restarting the computer (although it is not recommended to do this again...).
Reset settings to optimal
If you changed any settings in the BIOS and the computer stopped booting (or, for example, the sound disappeared) - or you just decided to return everything back to the way it was - then know that the BIOS has a special function for resetting settings. Those. this function will return all settings to default (i.e. it will do everything by default, as it was when purchased).
You can reset the settings in two ways:
- press the button F9(however, it does not work in all BIOS versions);
- go to the section Exit, then click on Load BIOS Defaults(see screenshot below).

Reset settings to default - AMI BIOS
By the way, after loading the default settings, you need to save them by pressing F10 (about this - see just above in the article).
In different BIOS versions, the name of the reset item may differ slightly. For example, the screenshot below shows the section Exit on a Dell laptop - here you need to click on Restore Defaults, and then save the tinctures - Save Changes and Reset. After rebooting the device, it will work with default settings.

Reset settings to default // Dell laptop // Restore Defaults
Setting up BIOS to boot from a flash drive/disk
Let's move on to the most important thing. I will look at the BIOS settings using the example of some of the most popular BIOS versions - AMI BIOS And Award BIOS(in principle, the main thing is to understand the meaning - everything is done the same way everywhere, there is a slight difference in the menu designation).
AMI BIOS
First you need to go to the section Advanced(extended, see arrow 1 on the screen below), then you need to open the section USB Configuration. Then check that all USB ports are turned on (that is, that the inscription next to them is lit Enabled)!

Checking USB ports - are they enabled?
- 1st Boot Device - CD/DVD... (means that the first boot device from which the PC will try to boot is the CD/DVD drive. If there is no boot/installation disk in it, the computer will try to boot from the 2nd Boot Device);
- 2nd Boot Device - SATA: 5M-WDC WD5000(computer hard drive. Windows is installed on it, therefore, it will boot if there is no disk in the CD/DVD drive).
Naturally, with such a download queue, the computer will not boot from the flash drive!

How it was and how it should be for booting from a flash drive // AMI BIOS
In order for the BIOS to see your flash drive, you need to change the boot queue to the following:
- USB: Generic USB SD;
- CD/DVD: 6M-TSST;
- SATA: 5M-WDC WD5000.
In this case, the BIOS will first check the flash drive inserted into the USB port, then the CD/DVD drive, and then boot from the hard drive. In most cases, the best option.
Award BIOS
In principle, it is configured in the same way, with a slight difference in the menu designation. And so, after entering the BIOS, I recommend immediately opening the section Standard CMOS Features.

In this section, check whether the USB ports (devices) are enabled. Just check that opposite the lines where “USB” is mentioned, it is everywhere (example in the screenshot below).

USB ports: do they work? They are working!
- First Boot Device (first boot device) - USB-HDD (the best choice for booting from a flash drive is a USB-HDD. In exceptional cases, if the BIOS suddenly does not recognize your flash drive, try USB-FDD) ;
- Second Boot Device (second boot device) - Hard Disk (hard drive).

Setting up the laptop BIOS
This is done in the same way as for a computer. True, there may be some “serious” differences in individual models, but overall everything is identical.
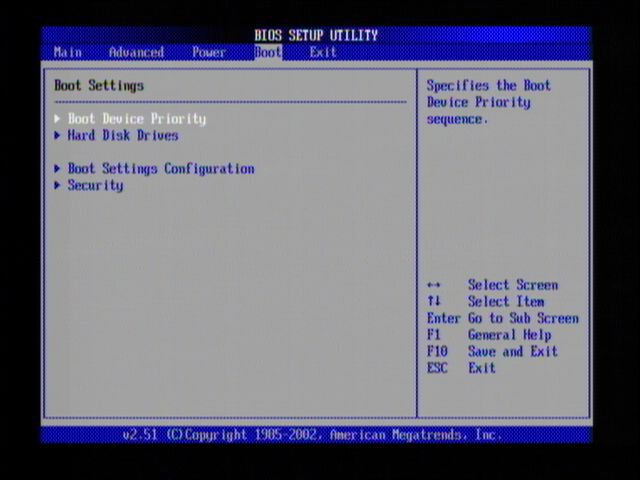
In laptops, there is a separate BOOT section for boot settings. Once you open it, all boot options are available to you.
I will give a universal version of the parameters that is most often used (using the example of a Dell Inspiron 3000 series laptop):
- Secure Boot - (secure boot mode is disabled. Only new versions of Windows 8, 10 support it, and many have several OSes, or use 7...);
- - (fast loading - in most cases, it doesn’t speed things up much...)
- 1st Boot Priority - the first boot device (USB drive);
- 2nd Boot Priority - second boot device (hard drive).

In many other laptop models, the BIOS settings are done in a similar way, the menus and settings are similar or the same.
A few words about UEFI
On modern computers and laptops, UEFI is used instead of BIOS. It is a more expanded and advanced version of the BIOS: for example, you can use the mouse in it, there is often Russification of the menu, etc. For the purposes of this article, I will say that in terms of editing the Boot section, everything is the same here...
For example, the photo below shows the main UEFI window on an Asus laptop, which is displayed immediately after logging into it. In order to open the extended menu and find the Boot section, pay attention to the bottom of the window: you need to press the key F7 (or press F8- and immediately start loading from the flash drive).

In the advanced settings in the Boot section, everything is done in the same way as in a “regular” BIOS: you need a flash drive (in my case "jetFlashTranscend 16 GB") just move to the first place and then save the settings (key F10) .

Booting from a flash drive/disk using Boot Menu
Why configure and change the boot queue in the BIOS when you can boot from a flash drive by pressing one button?
We are talking about the Boot Menu - the boot menu, translated into Russian. If you call up this menu, you can choose where to boot your computer/laptop from: from a hard drive, from a CD/DVD drive, from a flash drive, from an SD card, etc.
The button for calling the Boot Menu is usually indicated on the first screen that you see after turning it on. Example in the photo below:
- F2 or Del - enter BIOS settings;
- F11 - call Boot Menu.

By calling the Boot Menu, you will see all the devices from which you can boot. An example in the photo below: you can boot from a hard drive, flash drive and CD/DVD drive.

Why doesn't the BIOS boot from a flash drive/disk?
1) USB controller disabled in BIOS
Almost all BIOS versions have an option to disable USB ports. Of course, if they are turned off, then you will not be able to boot from a USB drive. Check whether they are enabled (or reset the settings to default) - just above in the article, I showed how this is done.
2) The bootable flash drive was written incorrectly
Often it may be recorded incorrectly due to incorrect program settings (in which you recorded it), or a “broken” ISO image with the system. I recommend reading this article:
3) After rebooting the computer, installation starts all over again
Quite often the following situation occurs. You inserted the USB flash drive, the computer booted from it and the installation began, then it rebooted and the installation began again. And so in a circle...
In this case, simply remove the flash drive and restart your computer. It will boot from the hard drive (where the installation files from the flash drive have already been copied)- and the installation will continue (rather than start again).
4) USB 3.0 and USB 2.0
Nowadays, modern PCs/laptops have several types of USB ports: USB 3.0 (USB 3.1) and USB 2.0 (USB 3.0 - marked in blue). “Old” Windows operating systems do not support USB 3.0, so in cases where the flash drive is “invisible,” I recommend trying to install the OS from a USB 2.0 port.

Case in point: USB 2.0 and USB3.0
5) USB-HDD, USB-FDD, etc.
In the BIOS, when setting the boot order, you usually need to select USB-HDD, but in some cases the BIOS does not see the flash drive. In this case, try changing the USB-HDD to USB-FDD.
6) Error “Reboot and Select proper Boot device or Insert Boot Media in selected Boot device and press a key”
It often occurs if you have, for example, a disk (floppy disk) connected to a computer that does not have boot records. Simply remove and disconnect all media except the one you intend to install from (for example, USB flash drives).
Instructions! Solution to the "reboot and select proper..." error -
7) Disconnect all extras from the computer. equipment
It is also recommended to disconnect the second monitor, printers, scanners, etc. from the computer. The fact is that when installing Windows, this can create additional problems. For example, I had a case where Windows incorrectly determined the default monitor and was "sending" the image to another monitor that was turned off (and I saw a “black” screen...).
8) Turn on Legacy mode
In the Boot section, you need to change the boot mode from EFI (UEFI) to Legacy (if available). I made a recommendation regarding this above. The fact is that not all Windows operating systems support the “new” feature (in addition, you need to correctly write the USB flash drive for this installation mode).
9) Turn off Secure Boot
In the BIOS, in the Boot section (usually) there is a Secure Boot option - also disable it, set it to Disable (if it exists).
10) Enable Launch CSM (if available (usually the Boot section))
In the BIOS, in the Boot section, change the Launch CSM mode to Enable (if it has one).
To solve many computer maintenance problems, it becomes necessary to create a bootable USB flash drive. This may be needed, for example, to flash an updated BIOS version or install an operating system.
There are many methods and different utilities for creating a bootable USB flash drive. But often these methods are complex and not user-friendly for a novice user (or require several different utilities).
But nevertheless, there are very simple ways. One of them is to use the rufus utility to create a bootable USB flash drive.
Rufus is a miniature, but very fast and functional program. With its help, you can very quickly make a bootable USB flash drive with the desired operating system for installation or maintenance.
Creating a bootable DOS flash drive using the RUFUS program
Let's consider the option of creating a bootable flash drive with a DOS system - to flash the latest BIOS version onto the computer's motherboard.
To do this you need to download the program itself
and insert the USB drive (flash drive) that needs to be made bootable. It is advisable to disconnect all other USB media for the duration of the firmware.Then run it with Administrator rights (since the utility will perform formatting, it requires advanced rights)
The program settings should be set as follows:
- On the "Device" tab, you need to select the desired USB drive from the drop-down list.
- "Partition scheme and system interface type" must be set to "MBR for computers with BIOS and UEFI"
- "File system" must be set to "FAT32"
- on the “New volume label” tab, you can set your own name for the bootable flash drive (to make it easier to recognize it among other media in the future)
- Be sure to check the boxes next to the values "Quick format" and "Create boot disk"
- next to the item “Create a boot disk”, select FreeDOS from the drop-down list
To complete formatting, click the "Start" button
You've probably noticed that now in many articles on fixing various errors in Windows or restoring it, they almost always recommend using a bootable flash drive with operating system installation files or a LiveCD. And only then do they remember to use the installation CD.
In principle, this is not surprising, since today DVD drives have already faded into the background, and they were naturally followed by CD/DVD discs. For example, when assembling a new computer, few people additionally buy and install a DVD drive; by the way, many PCs that are sold already assembled do not have a drive installed either. Well, I’m generally silent about modern laptops or netbooks; in most models the drive has been missing for a long time.
Just in this instruction we will look at several examples of how to set boot from a flash drive in different BIOS versions. In this article you can find examples both for the earliest versions of BIOS and for some modern UEFI versions from various manufacturers.
Procedure for installing boot from a flash drive in BIOS
Setting up booting from a flash drive in different BIOS versions may differ slightly, but in principle the algorithm itself is the same for everyone.
- We write or with ;
- We connect the prepared USB drive to the computer. If you are planning to install Windows, I recommend connecting the drive to USB 2.0, that is, to ports that are painted black (blue is USB3.0). So, sometimes the system may refuse to start installation due to the lack of drivers for USB3.0 to which the device was connected;
- Turn on or restart the computer and enter the BIOS using the " Del" or " F2" If none of these keys work, you can find options that can help you here;
- In the BIOS, open the “Boot” section, where in the list of boot devices we move the flash drive to the first place;
- By pressing the “F10” key and saving the changed parameters, we try to boot from the device we connected;
In general terms it looks something like this. Well, now let's specifically go through each BIOS version.
Booting from a USB flash drive into Pheonix AwardBIOS
AwardBIOS is a rather old version of the BIOS, and today it is very rare to come across it, but it still happens sometimes.
So, having entered the BIOS, we need to go to the “” tab.


Initially, the hard drive will be in the first positions, or if you have several of them, then all hard drives will be displayed first and only then the connected USB device. Here you need to use the " + » Move the flash drive to the very first line.

Then we return to the previous menu using the “ Esc" and in the parameter " First Boot Device" select the value " USB-HDD" (By the way, some versions of this BIOS may not have such a line, so you can try selecting either USB-FDD or USB-CDROM).

Well, in the parameter “ SecondBootDevice » set « HardDisk».
By pressing F10, save the settings and restart the computer.
Booting from a flash drive in another version of Pheonix AwardBIOS
Also, there are several more versions of Pheonix AwardBIOS, in which the principle of installing boot from a flash drive is similar, but the menu itself is slightly different.
We'll start by checking whether the USB controller is directly enabled:

Installing boot from USB flash drive:

By the way, I would like to draw your attention to the fact that this BIOS version may have several more options for installing boot from a flash drive, for example:
- In some cases, it is enough to simply select “USB-HDD” in the “Boot” section as the first device from which the computer will boot.
- Sometimes a flash drive can be found not in the hard drive settings, but in the “Removable Drives” subsection;
How to set boot from a USB drive in AMI BIOS
AMIBIOS is another version of BIOS, which is often found on not the latest motherboards. boards. In general, if once in the BIOS its appearance is the same as in the screenshot below, then to install the flash drive as a boot device you need to follow these steps:

In this BIOS version, also, the flash drive can be found not only in “ Removable Drives", but also in "", so be careful.
We set boot from a flash drive in UEFI BIOS Gigabyte
Now, let's move on to more modern types of BIOS, which can be found on later models of motherboards from various manufacturers.
Well, right now we will start with the UEFI BIOS on the Gigabyte motherboard.
So, having entered the BIOS using the same “Delete”, “F2” or “Esc” keys, go to the “ tab BIOS Features" Here you can see that initially booting from a flash drive will only be available in UEFI mode.
Well, since this option won’t suit most people, because the regular Legacy mode has a higher priority, we need to change it. To do this, go to the line “ Hard Drive BBS Priorities".

IN " Boot Option #1"We set a bootable USB flash drive instead of a hard drive, respectively, in " Boot Option #2", HDD must be installed.

After that, in the previous menu you will be able to select a flash drive as a boot device, but without the UEFI prefix.
There is another boot option, which, it seems to me, is much easier to use, but its trick is that it serves for a one-time boot from a USB drive, that is, the next time you reboot you will have to choose to boot from it in the same way again.
In order to use it, you need to move to the “ Save & Exit" and in " Boot Override» select the required device to boot the computer.

The beauty of this option is that it does not require any additional changes to the BIOS settings, and later you simply do not have to bother with returning the boot settings to their original position. By the way, this option is very similar to the same Boot menu, although in this case we will have to go directly to the BIOS.
Booting from a flash drive on ASUS motherboards
The BIOS on ASUS motherboards also has several options for starting a computer from a bootable USB flash drive with Windows.

On more modern motherboards the principle is the same. Below I will show an example using the same ASUS.
After entering the BIOS, on the initial screen we again need to use the mouse to move the priority device to the very top. Up because this menu has moved to the right side and become vertical.

You can also use the boot menu, as I showed in the previous example.
By going to " AdvancedMode ( F7)" and going to the tab " Boot", you can change the download priority manually in the " Boot Option Priorityties ».

Or simply select the desired device and start downloading from it in the “ Boot Override", which is located in the same "Boot" tab.

Booting from a flash drive in BIOS on an MSI motherboard
Regarding the motherboard in MSI, here we can set the boot from a flash drive in two ways.

In general, I hope that you will find an option that suits you, and that you will be able to set boot from a flash drive in your BIOS without any problems.
How to set boot from a flash drive in old and modern BIOS versions
There are many types of BIOS: Ami, Award, Phoenix Award, UEFI. Let's figure out which buttons to press when booting a computer or laptop so that go to BIOS and boot from a flash drive to install windows. I would like to note that the traditional key delete, F2 to enter the BIOS. Below are button combinations on how to enter the BIOS to boot from a flash drive.
Buttons for entering bios from laptop and computer manufacturers.
Buttons from BIOS manufacturers
How to set the BIOS to boot from a flash drive to install Windows
Let me start with the fact that you don’t always need to go into the BIOS to swap the bootloader to install windows. For this there is a so-called start menu. To go there, you need to turn on the computer, sometimes a key is written. In this case F12. Press the key that is written in the word Boot Menu.

How will we start the computer: USB flash drive or other devices. Next will be the installation of the Windows system.

How to install boot from a flash drive in Ami Bios
- Click Device Priority.
In line 1st Devise set priority from the flash drive. That’s usually all, but many have encountered why I did everything correctly, but the computer does not start from the flash drive. Sometimes you just need to specify, in addition to the priority, forced loading in the line Hard Disk Drives.
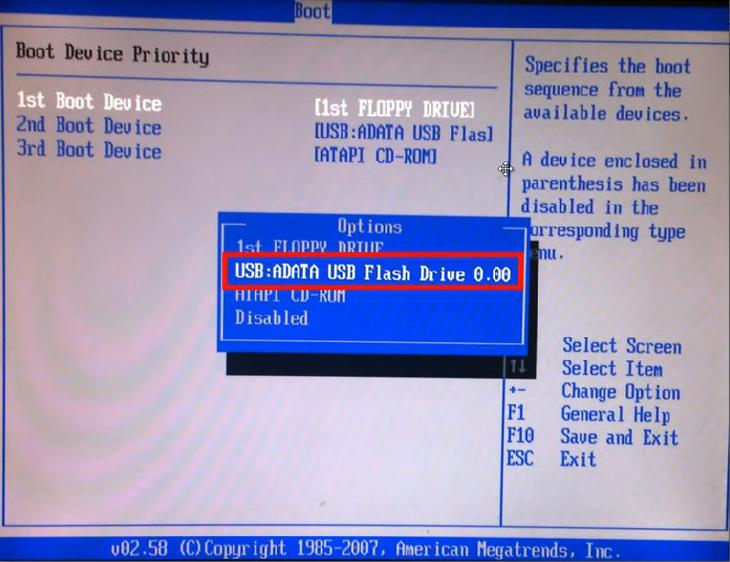
- IN Hard Disk Drives set a forced launch from a flash drive.
- IN 1st drive select the media.
- Press F10 to save.
It turned out that in the settings of 1st Devise and Hard Disk Drives there is a bootloader with USB Flash i.e. We set the priority option, tried it and it didn’t work. Then we set a forced launch and everything worked out. And so on in all BIOS versions, if priority loading fails.

How to set Award Bios to boot from a flash drive
- Let's go to Advanced Features.

- Click First Device, in the context menu we set which bootloader we will start the computer with. We have chosen the primary device to launch.
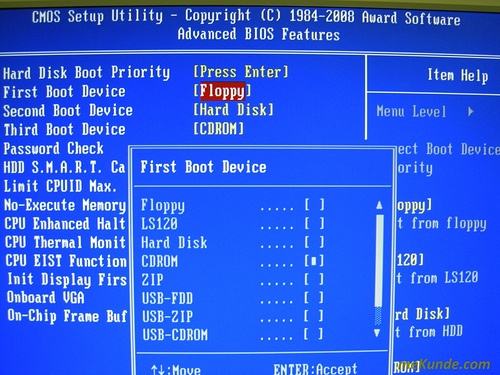
- Hard Disk Priority put the flash drive in 1st place. (If in First Device If you choose to start from a drive, then you need to install a flash drive in Hard Disk Priority).
- Award is ready, press F10 to save.

How to boot from a flash drive in Phoenix Award Bios
- Settings Advanced, in line First Boot Device install a flash drive or other device.
- Click F10 to save.

New UEFI BIOS in which you can control the mouse.
- Line Boot Priority, change places by dragging with the mouse. Can be done through advanced settings > Exit/Advanced mode and choose Advanced mode.

- Presses Boot and select in Boot Option #1 loader.

Going into the BIOS and booting from a flash drive to install Windows turned out to be quite simple, you just need to change the type of boot. And remember about the priority and forced bootloader.


